How to Read Sections

Throughout your home renovation project your architect should be able to provide you with 3D floor plans and other 3D images of the design. These are incredibly helpful for all involved, especially at the preliminary design stage. However, to receive permits and to have your project built, you will need a comprehensive set of construction documents.  There is a lot of information that needs to be conveyed and the bulk of this information gets conveyed in plans, sections and elevations. These are 2d drawings that are packed with information, and many people have difficulty understanding how to read these drawings.

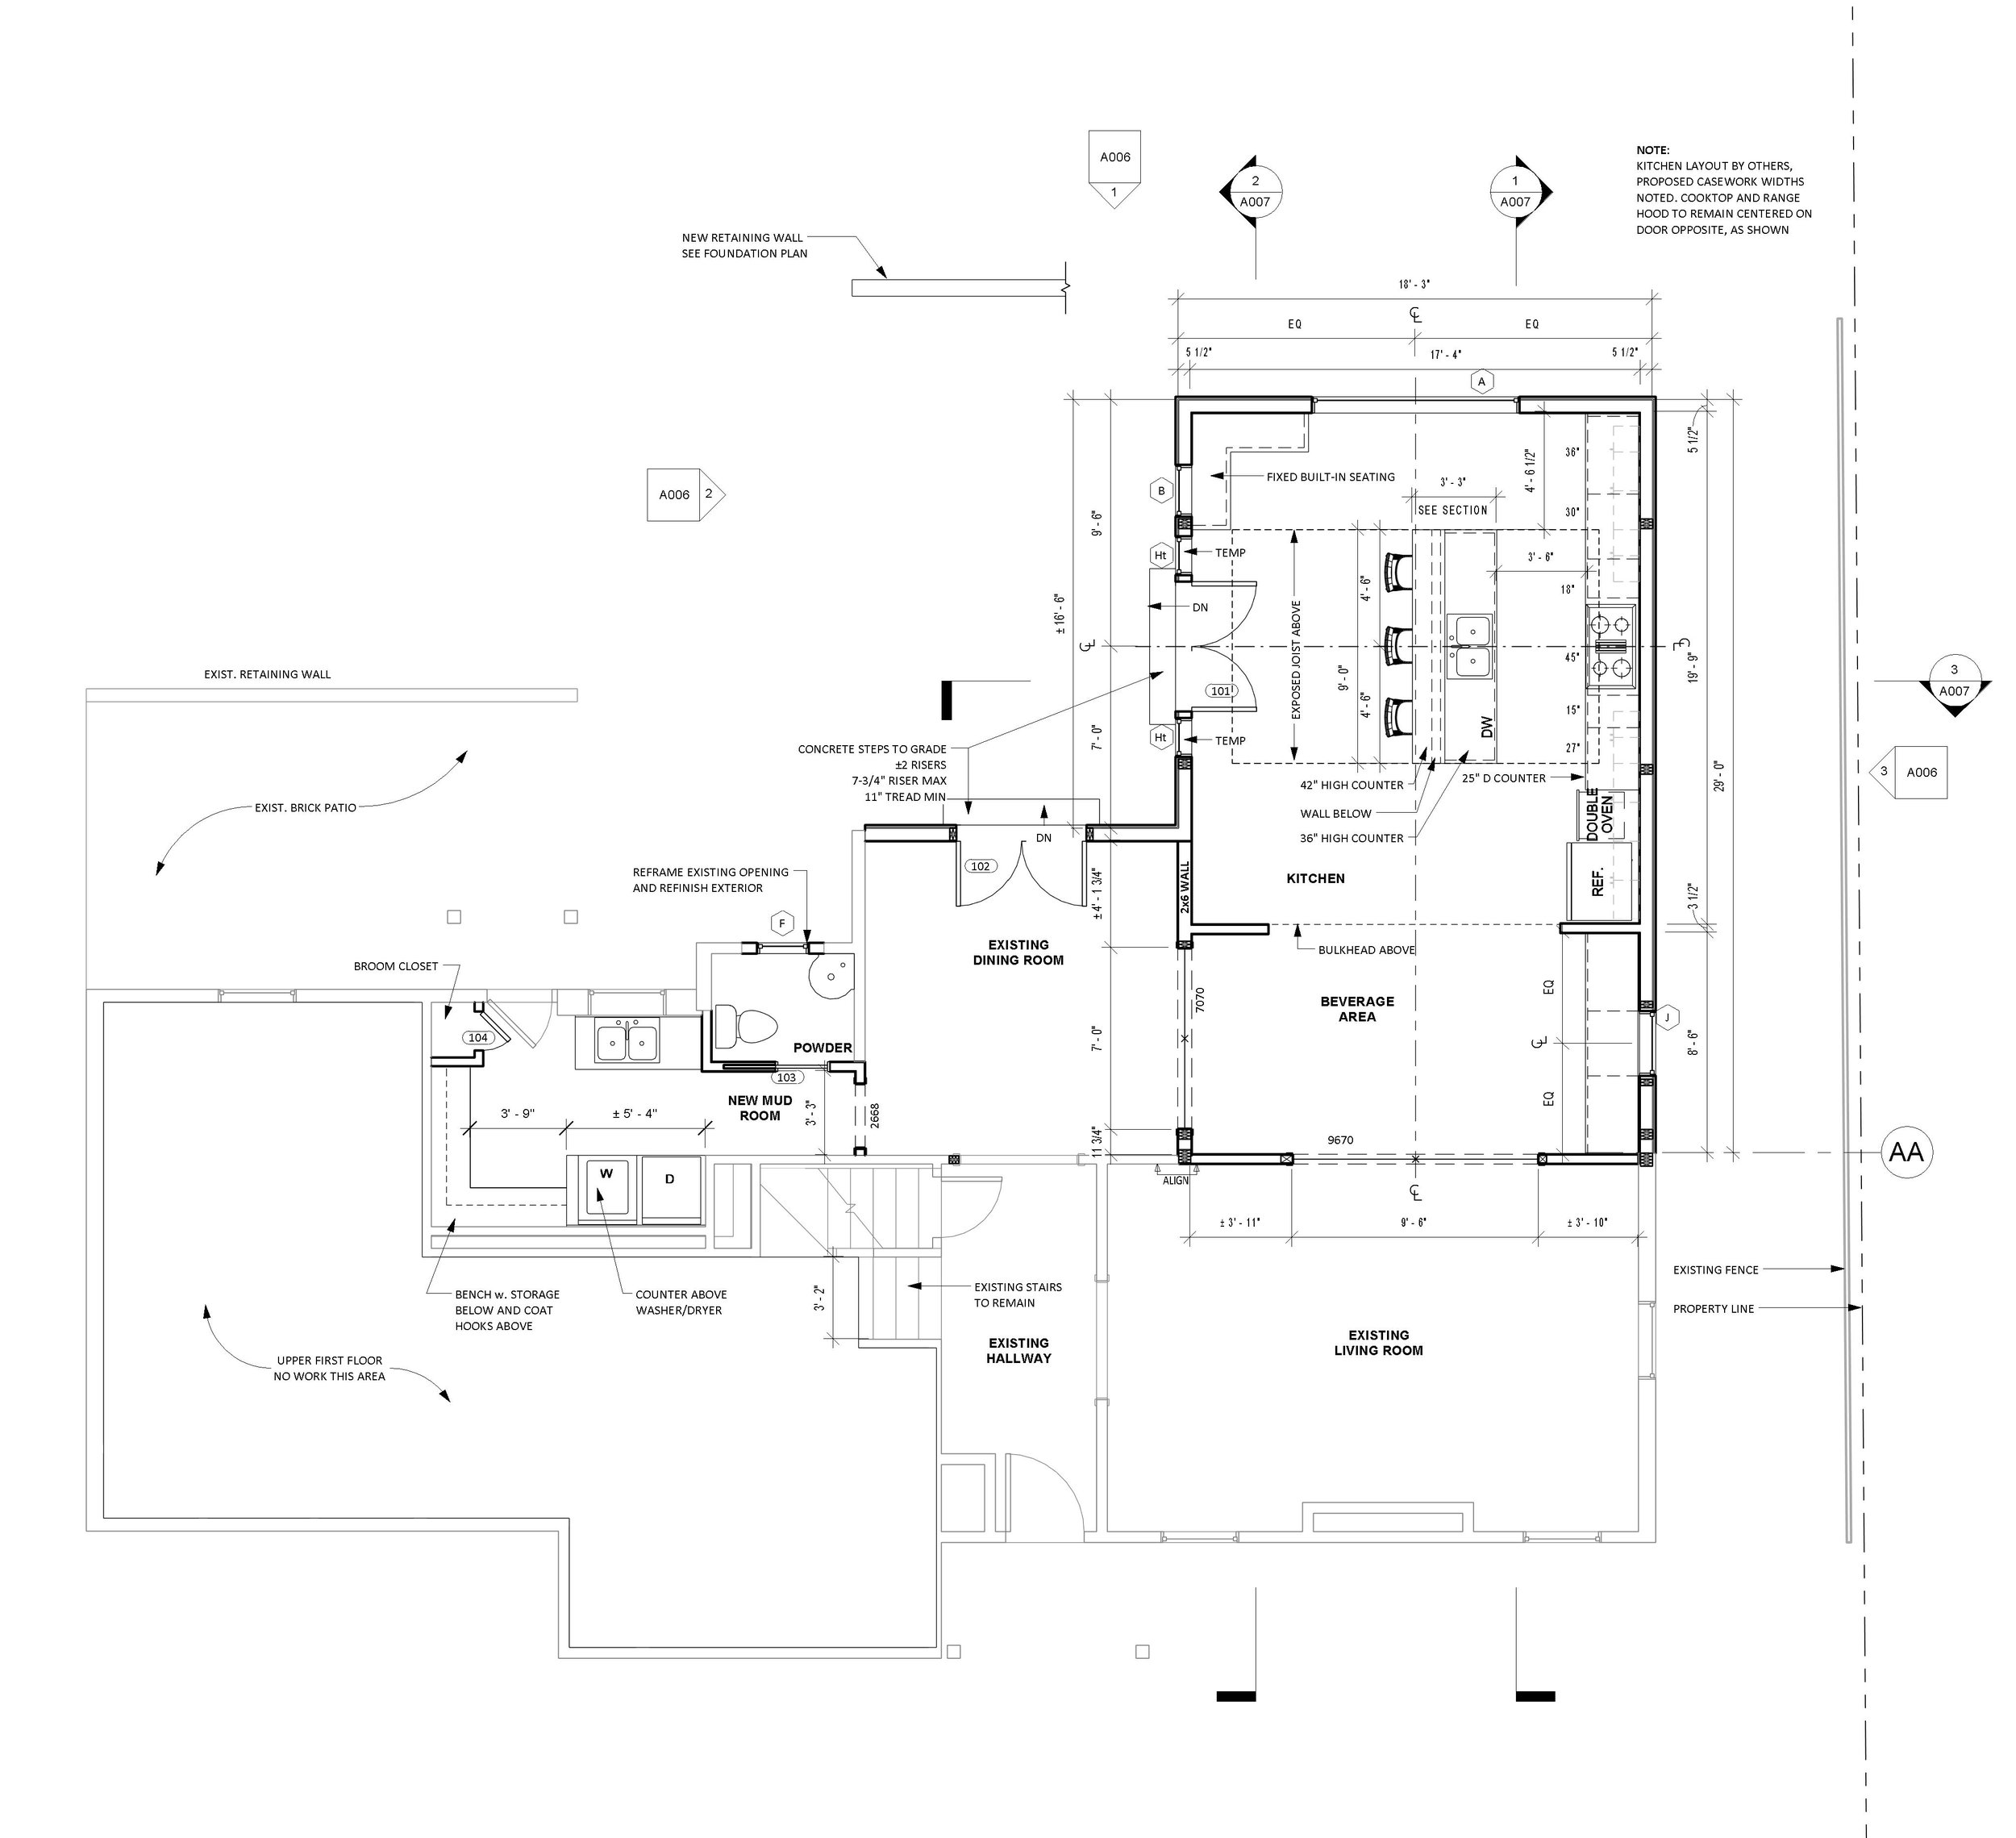
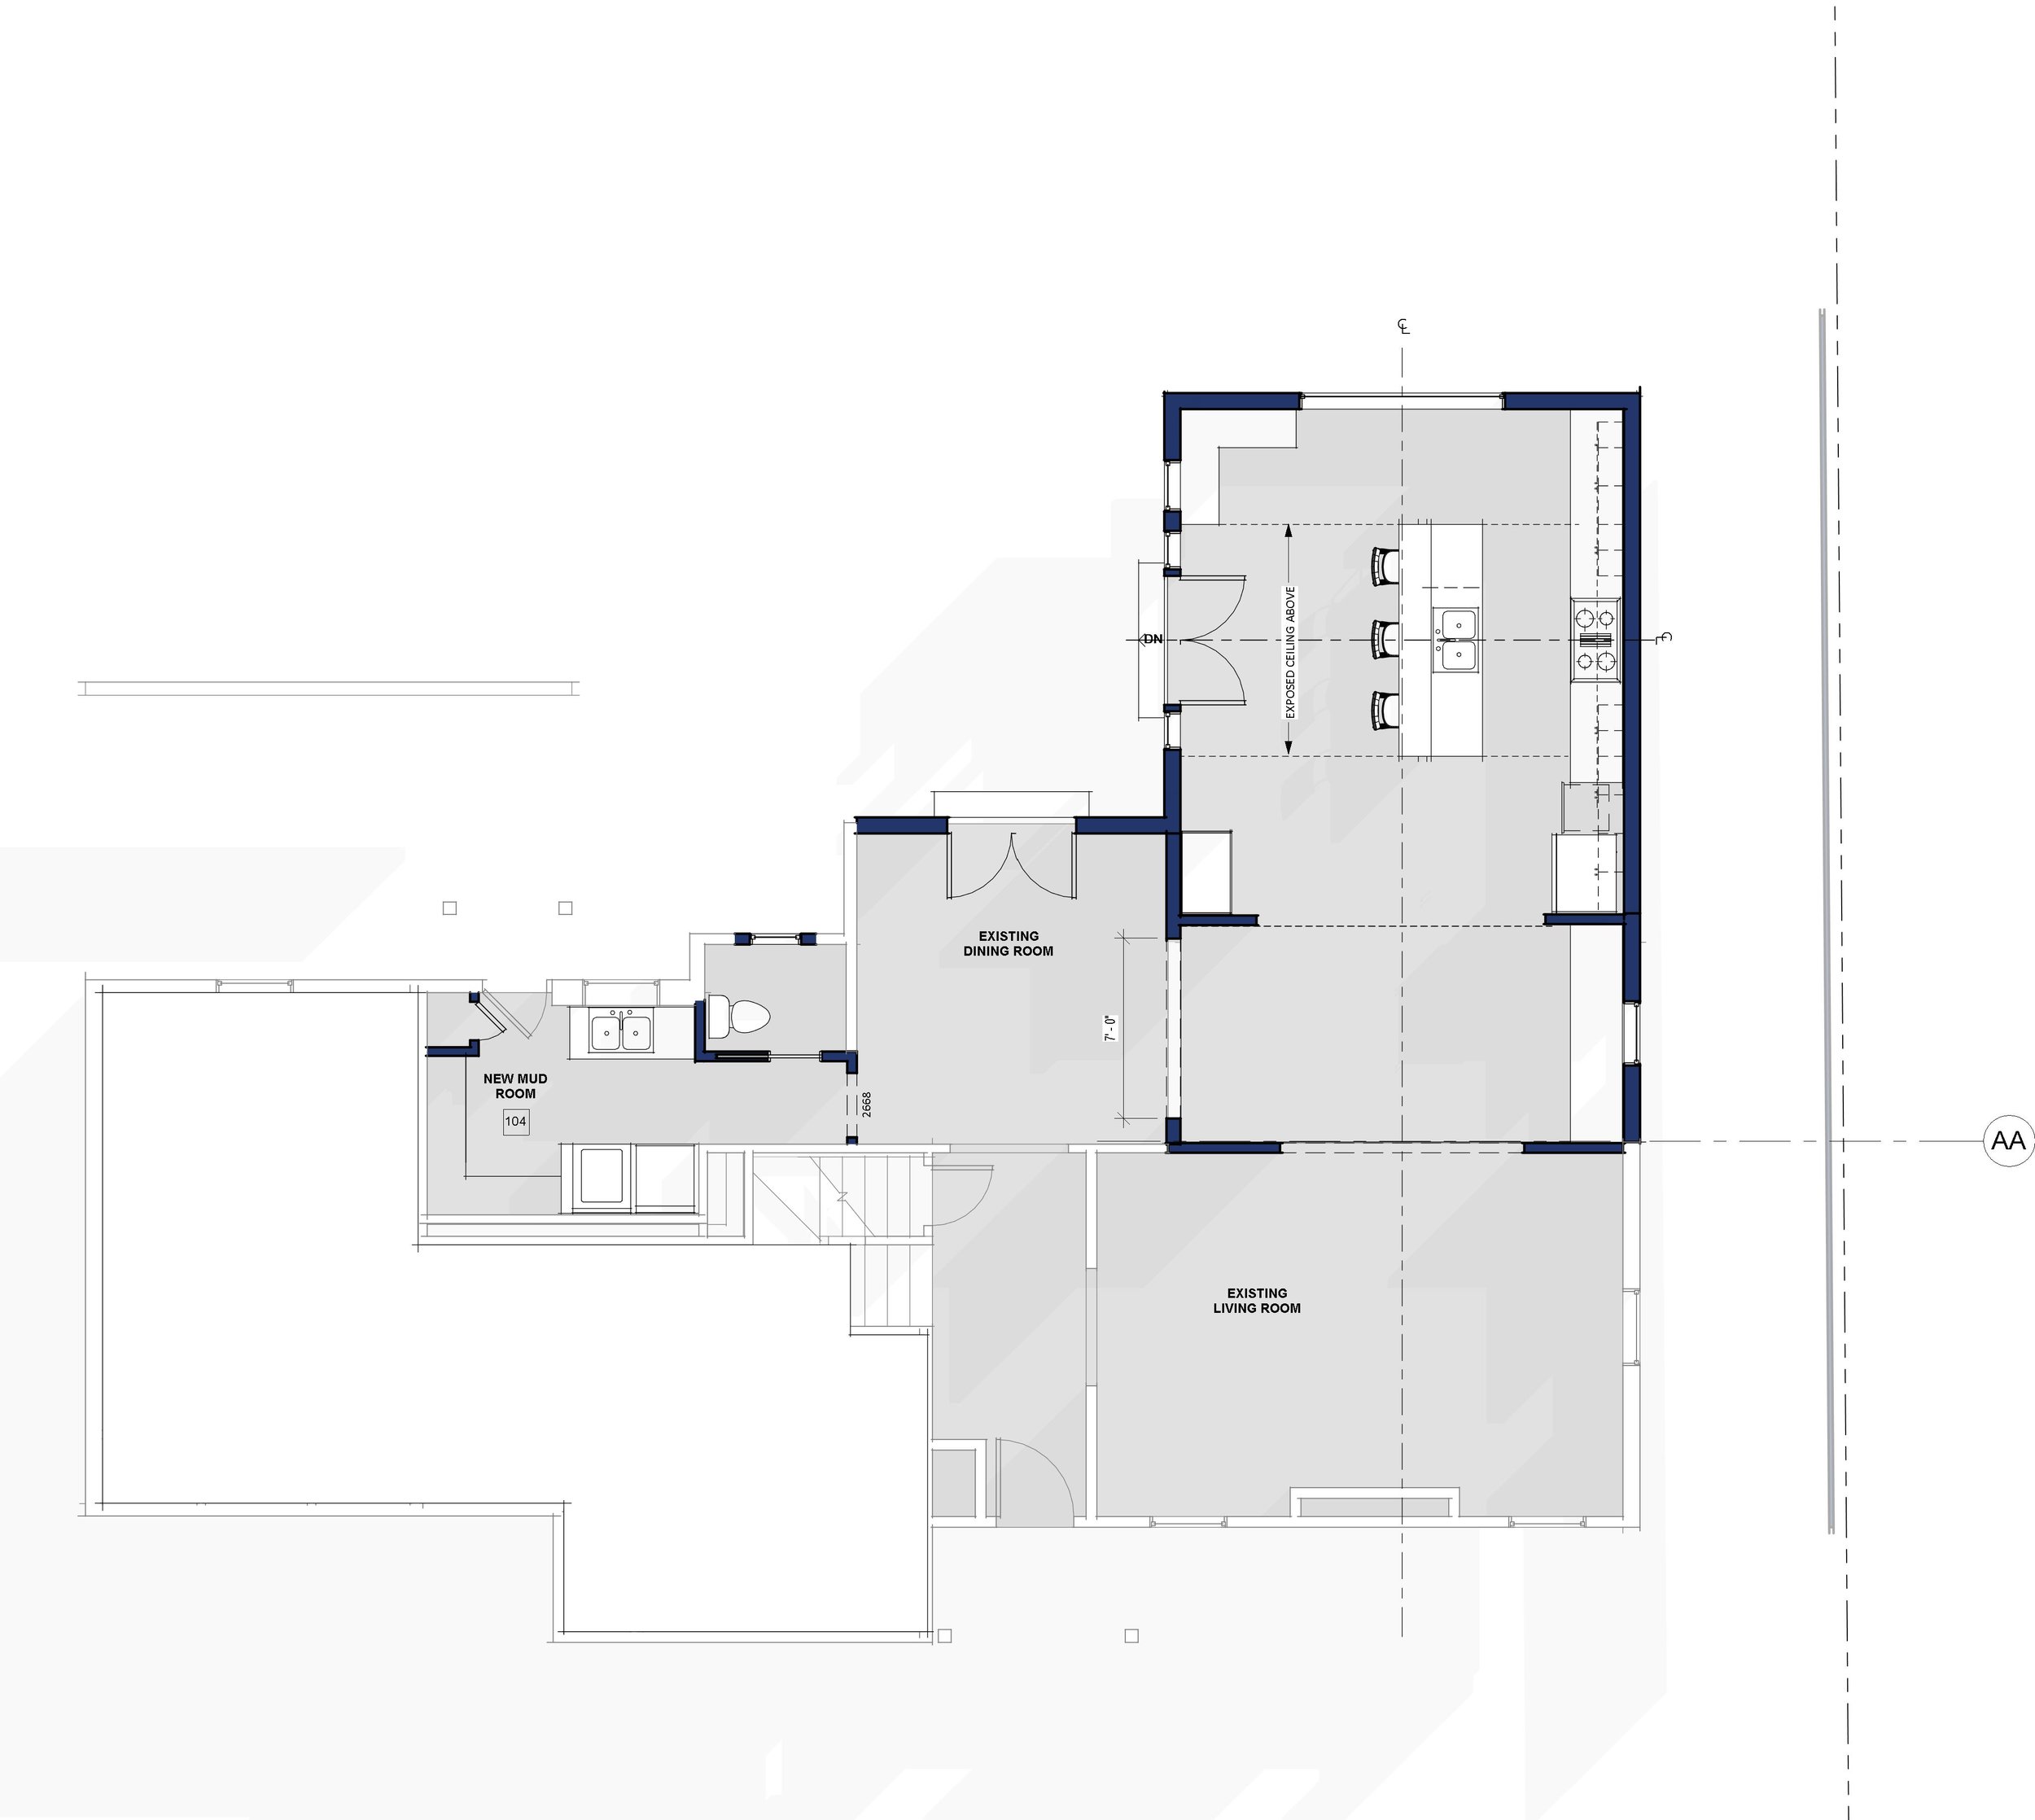
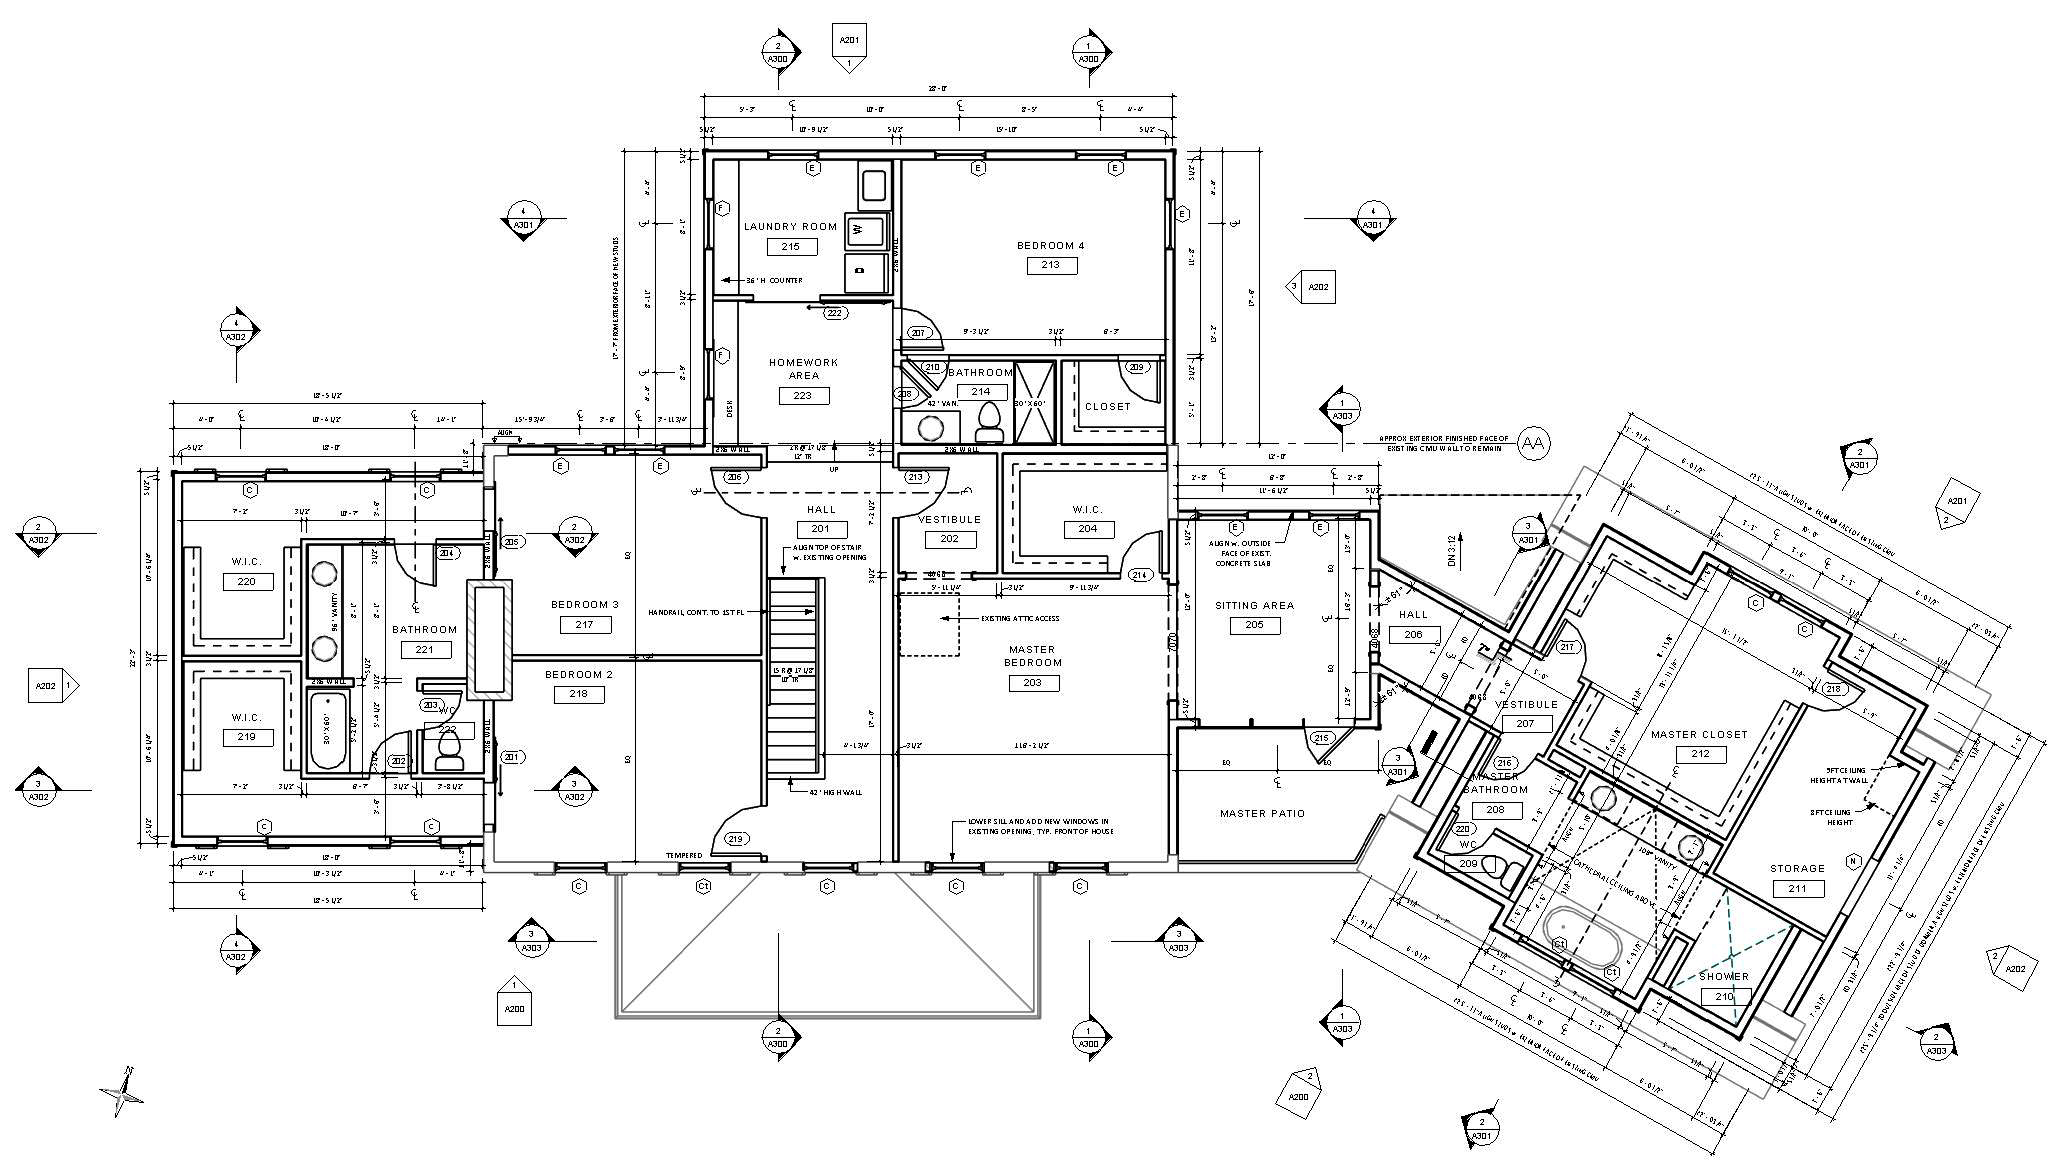
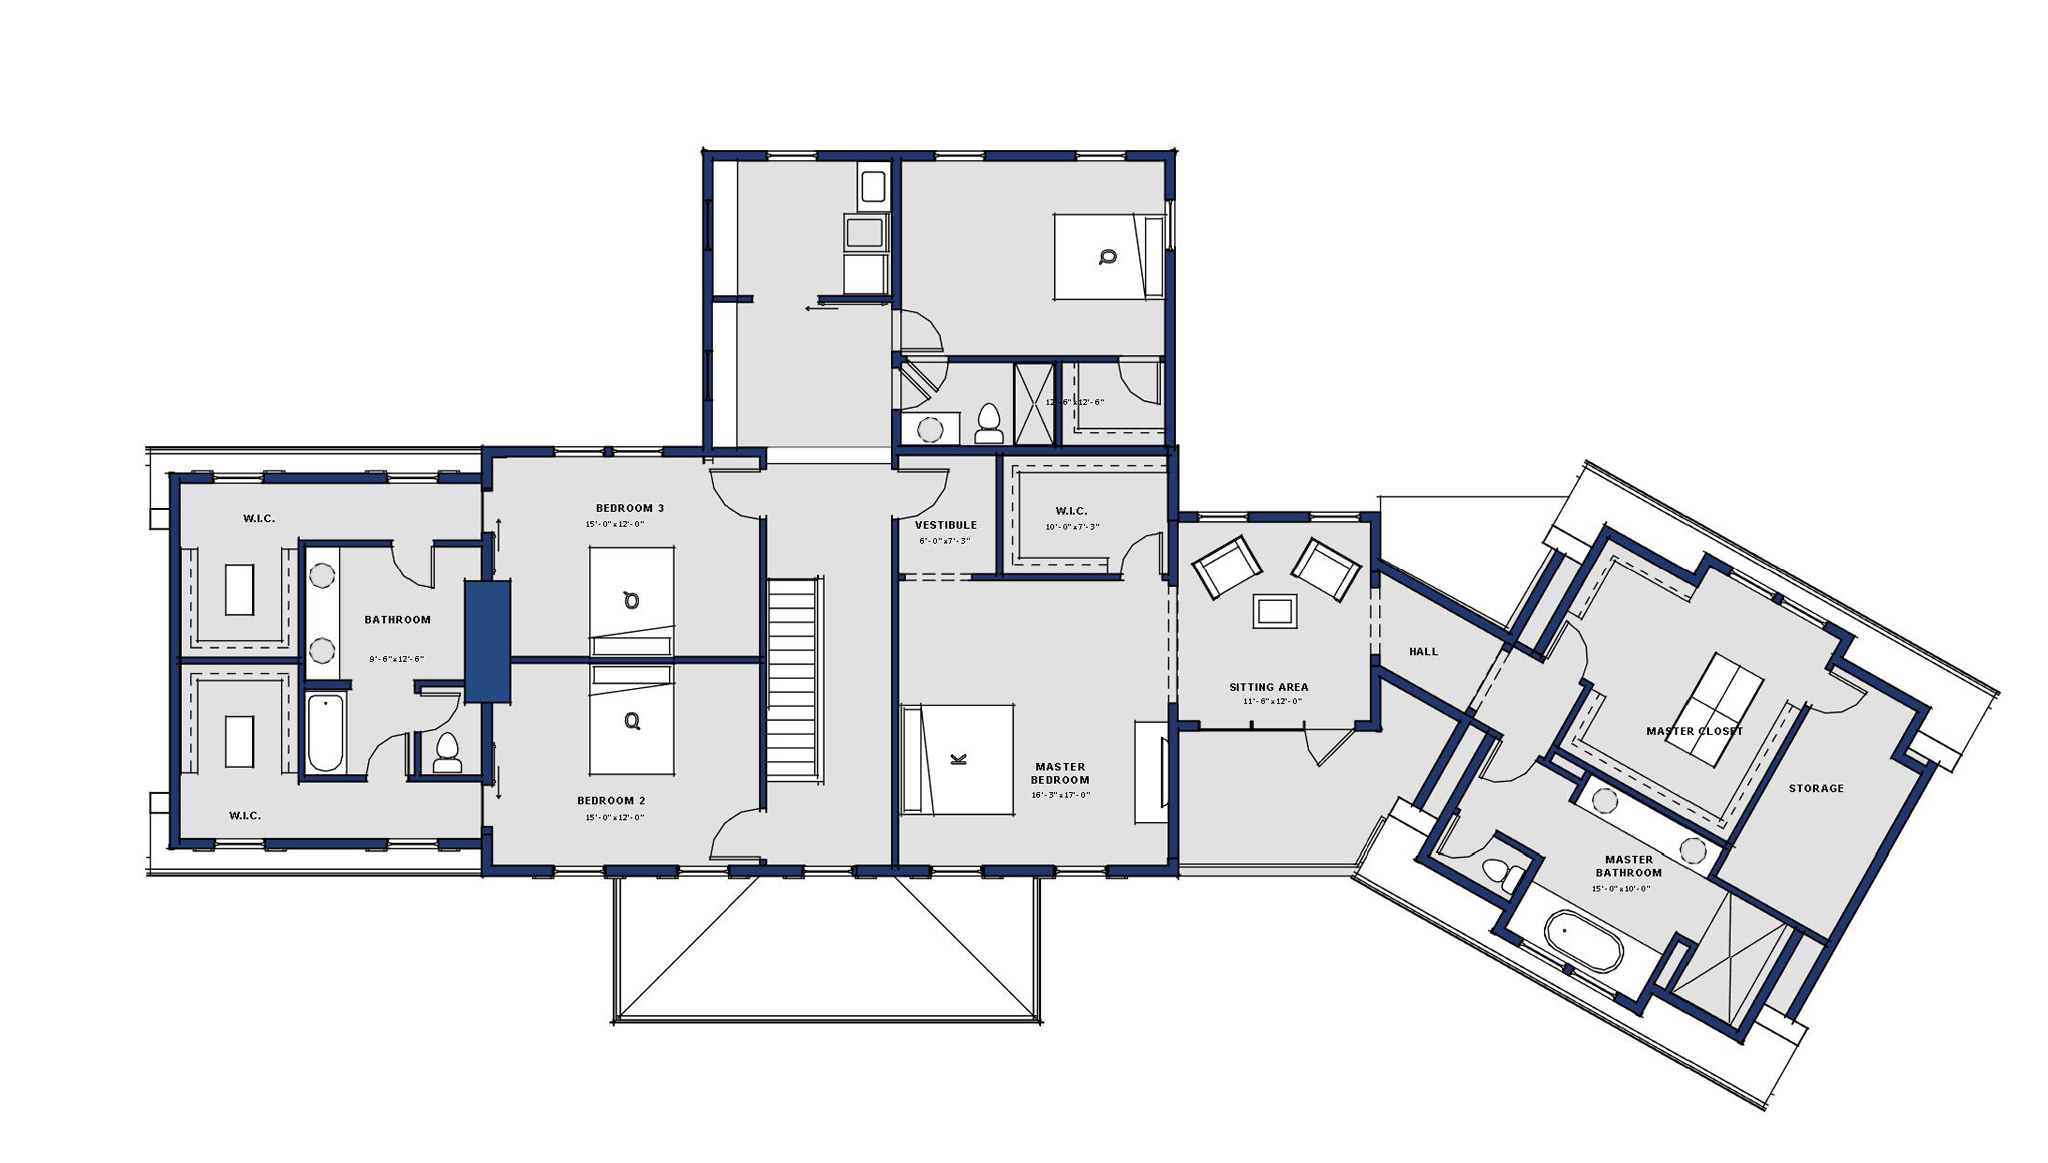
A previous post covered how to read floor plans.

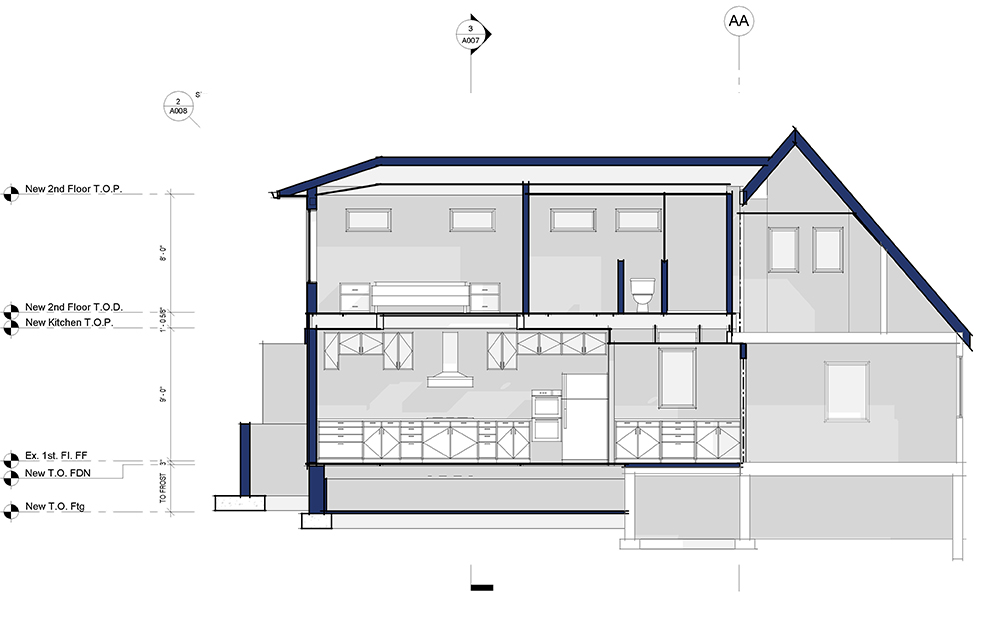
This post will cover how to read your section drawings.

Sections depict the vertical relationships between the spaces shown on your floor plans. They relate spaces above and below each other and provide information about wall heights, floor-to-floor heights, stair clearances and roof slopes, among other things. While your plans show the horizontal relationships between walls in a room, sections show you how tall those walls are. Together, these two drawing types provide an accurate description of the size and shape of the space you are trying to create.


Let’s look a little more in depth at some of the information shown in your sections.

Sections show your ceiling heights. Heights from 8 to 10 feet are common. People often request heights greater than that, not fully realizing how high a 10 foot ceiling really is. A graphical silhouette can help, give your drawing scale, though these are usually not shown on construction drawings. Above 10 ft you may be required to have thicker walls which can add expense to your project and cut into your finished floor space.

Sections also show your floor assembly depth. This is generally the sum of the floor joist and the subfloor above the joist, to which your finished floor will attach. Joists in the 12” range are common, but if you want a really wide open plan you may end up needing deeper joists, which would increase the depth of your floor assembly. This is usually not visible space, but increasing this depth can affect stairs, overall building height and cost.

Sections also show detail callout markers. These are usually rectangular dashed line shapes with a bubble and a number. This alerts you to the fact that there is more information about a specific area in your project on another drawing. This is because every project will have some special conditions that require the architect to provide more detailed drawings. This detail can’t be seen at the typical scale of the section, so a blow up drawing of one small area is provided. If the mark next to the callout says 3/A501 the additional detail can be found at drawing #3 on sheet number A500.

How to Read Floor Plans

Throughout your home renovation project your architect should be able to provide you with 3D floor plans and other 3D images of the design. These are incredibly helpful for all involved, especially at the preliminary design stage. However, to receive permits and to have your project built, you will need a comprehensive set of construction documents.  There is a lot of information that needs to be conveyed and the bulk of this information gets conveyed in plans, sections and elevations. These are 2d drawings that are packed with information, and many people have difficulty understanding how to read these drawings.

This post will cover how to read your floor plans. Floor plans are presented as a view from above looking down at the floor. It is assumed that the plan is “cut” at about 48” above the floor.

The primary goal of the floor plan is to provide information about the location and relationship of the spaces you want to be built. We define these relationships by locating walls, doors, windows and other items. One of the key elements of reading your floor plan is to identify the dimension strings. These sets of dimensions give instructions about where to place walls and how thick those walls are. There will usually be multiple strings of dimensions next to each other, as it helps to separate things like the location of windows from the overall dimensions.

Another important feature in floor plans are plain language text notes. These are brief explanations of something to which the architect wants to draw attention. Text notes are used to point out existing items, atypical conditions or special instructions to the builder.

In addition to dimensions and notes there are often special symbols on a plan that direct your attention to another drawing or a schedule. Marks near windows and doors, often a single letter or a few numbers, indicate the type of window or door. This mark will match a line on schedule, which is a spreadsheet containing additional information. For example, if you see a “B” in a hexagon next to a window you can refer to the window schedule to see that window “B” is 36” wide and 72” tall and is made of wood, etc. Some other symbols found on plans include section and elevation markers. These drawings provide information about the vertical separation between spaces, exterior siding, roof pitches, etc, that can’t be shown on a floor plan. Floor plans will have references to these drawings though, so you can understand where those drawings are in the context of your design. A section marker is usually a circle with an arrow, and a sequence of numbers explaining which page the drawing is on.

Did you have any specific questions that weren't covered here? Leave a comment or send us an email. Check back soon for how to read your sections and elevations!

Master Bedroom Ideas

How much space do I need for my new master bedroom?

This is a common question for homeowners building a new addition. Like everything else, it depends and there are lots of options. You can begin to identify the correct size for your space by considering how you will be using it. Do you have a king bed? Do you want a sitting area in the bedroom? Do you want a walk-in closet?

Large master bedroom with walk-in closet behind the bed wall and space for a sitting area in the lower left corner

The images in this post show a few different master bedroom designs we have recently presented to some of our clients. Some of these have already been built, some will be constructed soon. They range from a modest 192 sq. ft to a luxurious 384 sq. ft. You can go smaller or larger, but this represents a good range.

Moderate sized bedroom with windows above the bed and a credenza opposite the bed. In this particular design the door into the bedroom will use concealed hinges so the door will "disappear" into the accent wall on the left.

The bed will always find itself against a solid wall with at least three feet on either side for a side table and good access. Depending on the orientation of the room you could also have clerestory windows above the bed. Do you want to watch TV from bed? Then you’ll need solid wall space in front, or a window with a credenza below.

An average sized master bedroom with dual sliding doors into a large closet.

Will you have a sitting area? Account for around 36” plus a chair or two. This will usually find itself in a corner or centered on a window.

A smaller version of the first bedroom on this page. Single opening access to a smaller closet.

Location and size of the master closet is always a key consideration. You will need at least five feet of width for the closet, which will allow shelves and hanging rods on each side and a path down the middle. At around nine feet of width you can begin to place furniture in the middle of the space, with shelves along the wall and still have circular access around the closet. Entry into the closet is often overlooked, but can be a good place for a personal design element. We like to either partition the closet off with a sliding door or have the closet open on either side of a wall behind the bed wall. See images below.

Home Addition - One Project Start to Finish - Design Development

This is part five of a series of posts that will attempt to tell the story of one project from beginning to end, from concept to completion. It is based on a typical home renovation project in Montgomery County Maryland, but many of the issues convey to most jurisdictions throughout the United States.

Part 1: Inception
Part 2: An Actionable Plan
Part 3: Site Assessment
Part 4: Schematic Design
Part 4B: Design Changes

Design Development

Design Development is a refining phase which takes us from Schematic Design to the beginning of Construction Documents. During this process the design becomes more detailed and major decisions points begin to occur.

The structural system is one of the major decision that should be resolved by the end of Design Development. Will the first floor be built over a crawl space or will it be a slab on grade? Will the new foundation be Concrete Masonry Units or Cast-in-Place Concrete? Will the floor framing be dimensional lumber such as 2x12s or will it be an engineered product like Plywood Web Joists? There are pros and cons to each of these decisions and there typically isn’t a right or wrong answer. While these items might not necessarily affect how your finished space looks, they definitely impact how the project is actually constructed.

Material finishes is another major decision that should be discussed, if not mostly resolved by the end of Design Development. You might not know which actual floor finish you want, but choosing tile, wood or carpet at this point will drive some of the structural and architectural decisions we have to make. You don’t have to choose your kitchen cabinets at this time, but if you know you want a 72” double vanity in your master bathroom, Design Development is the time to confirm that decision so we can be sure everything fits and that plumbing and structure can be coordinated.

As the design becomes more solidified, the drawings you will be presented with will become more detailed and less sketchy. This doesn’t mean that you can’t still make changes if what you’re given isn’t exactly what you want. Sometimes as the drawings and structural systems become clearer new challenges and opportunities present themselves.